
WhatsApp webhooks are really hot right now! If you want to connect your WhatsApp Business with automation tools, this guide is perfect for you. I’ll show you exactly how to do it step by step.
Why Everyone is Talking About WhatsApp Webhooks?
WhatsApp has over 2 billion users, and businesses are using webhooks to reply to customers instantly. When someone sends you a message, your webhook gets it right away and can respond automatically. Pretty cool, right?
What You Need to Get Started
Before we start, make sure you have these things ready:
- WhatsApp Business Account (must be active)
- Meta Developer Portal access
- N8N platform ready
- Some basic tokens from Meta (I’ll show you where to get them)
Don’t worry if you don’t know much about webhooks – I’ll explain everything as we go!
Setting Up Your WhatsApp Webhook
Part 1: Making Meta Trust Your Webhook
First, we need to prove to Meta that our webhook is real and safe. We’ll use 3 nodes in N8N for this.
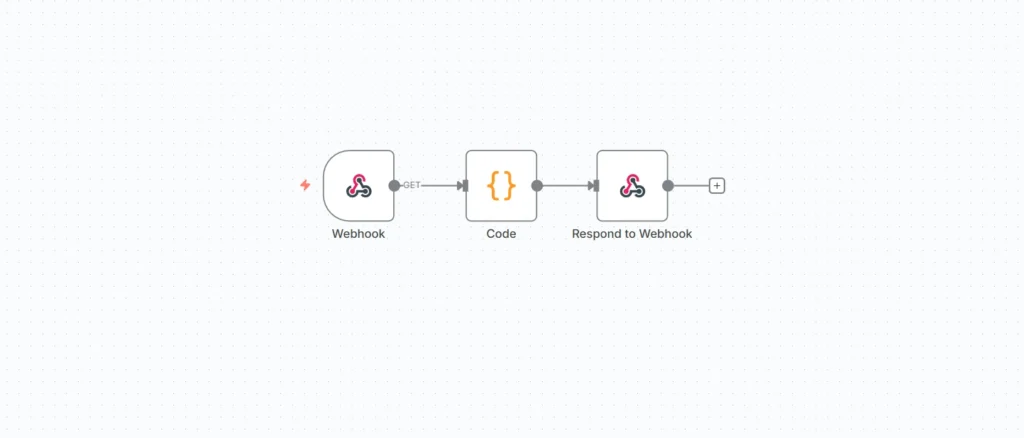
Node 1: Webhook Trigger (GET Method)
Create your first node with these settings:
- Method: GET request
- Authentication: None
- Respond Option: “Using ‘Respond to Webhook’ Node”
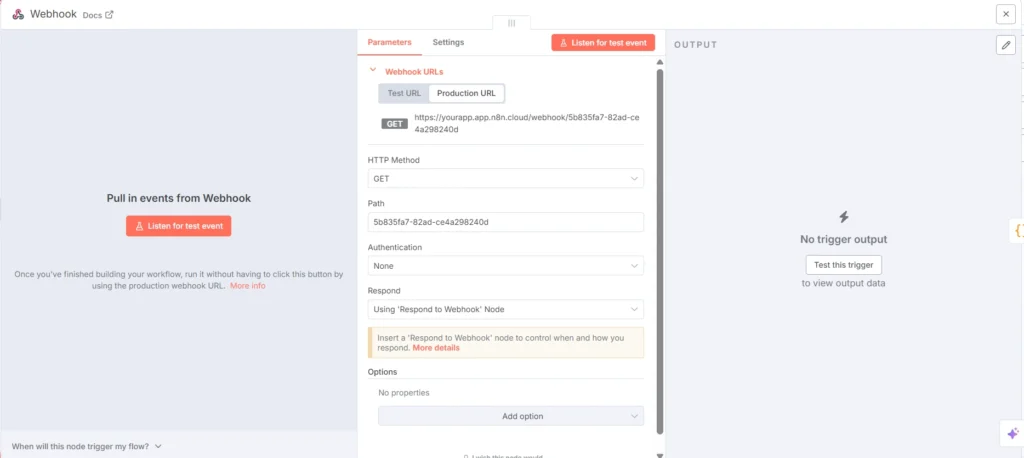
Important: Use your real webhook URL in Meta Developer Portal, not the test one. Your workflow must be live!
Node 2: Code Node for Token Check
This is where the magic happens. Add this code:
const query = $input.first().json.query || {};

// Check if Meta is trying to verify us
if (query['hub.mode'] === 'subscribe' &&
    query['hub.verify_token'] === 'your_token_here') {

    // Send back the challenge code
    return [{
        json: {
            challenge: query['hub.challenge'],
            isVerification: true
        }
    }];
} else {
    // Handle normal messages
    return [{
        json: {
            data: $input.first().json,
            isVerification: false
        }
    }];
}
Pro Tip: Use the same token in both your code and Meta Developer Portal. Make it strong like a password!
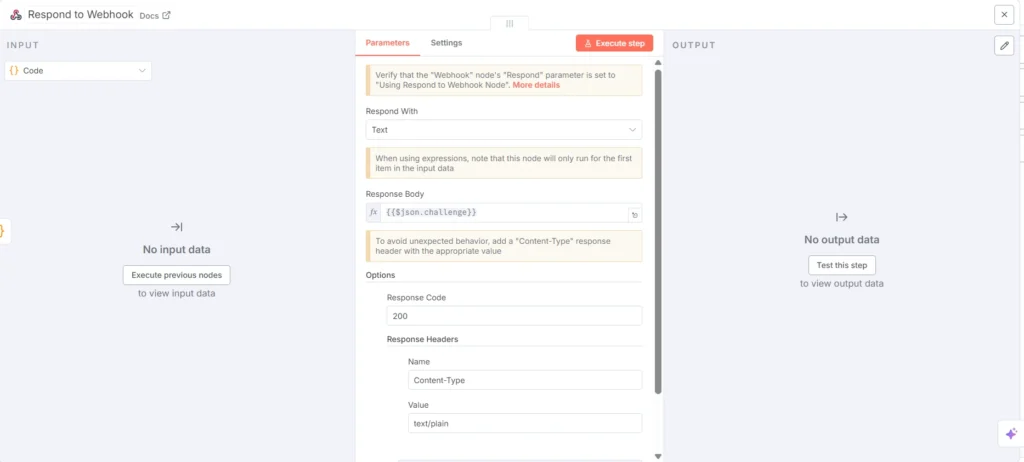
Node 3: Response Node
Set up your response node like this:
- Type: Text response
- Request Body:
{{$json.challenge}} - Response Code: 200
- Response Header:
- Name: Content-Type
- Value: text/plain
That’s it! Your webhook verification is ready.
Part 2: After Meta Accept
Once Meta approves your webhook, you need to do these things:
Turn Off the 3 Verification Nodes
These 3 nodes were only for getting approved by Meta. Once that’s done, turn them off. If you keep them on, they’ll mess up your real messages.
Create a New Node for Real Messages
Make a new webhook trigger node:
- Method: POST (messages come through POST)
- Path: Same path as your verified webhook
- Authentication: None
- Respond: Immediately
Now you’re ready to get real WhatsApp messages!
Making Sure Messages Actually Come Through
This is quite a serious issue. Sometimes, after the webhook is verified, test messages are received but actual user messages stop coming the next day — even though everything in the setup looks perfect. The good news is that this can be fixed very easily. You just need to call two HTTP nodes. Simply add your credentials, copy-paste, and run them. I’m confident this will solve your issue, as long as you follow the steps carefully.
Check Your Connection Status
Your WhatsApp account needs to be connected to your webhook. Use this command to check:
curl -X GET 'https://graph.facebook.com/v23.0/your_whatsapp_business_id/subscribed_apps' \
-H 'Authorization: Bearer your_access_token'
If you see empty data like this, you’re not connected yet:
{
  "whatsapp_business_api_data": {}
}
Connect Your Webhook
If the data is empty, run this command to connect:
curl -X POST 'https://graph.facebook.com/v23.0/your_whatsapp_business_id/subscribed_apps' \
-H 'Authorization: Bearer your_access_token'
You should get back:
{
  "success": true
}
Perfect! Now your webhook will get messages.
Double Check It Worked
Run the first command again. This time you should see lots of data, which means everything is connected properly.
When Things Go Wrong (And How to Fix Them)
Problem 1: No Messages Coming
What’s happening: Webhook works but no messages show up
Quick fixes:
- Check your phone number is “Active” in Meta
- Make sure your app is in “Live” mode
- Check if you’re connected using the commands above
- Make sure your POST webhook node is turned on
Problem 2: Can’t Get Verified
What’s happening: Meta says verification failed
Common fixes:
- Check your token matches exactly in both places
- Make sure you’re using GET method for verification
- Your N8N workflow must be active when Meta checks
- Use the real webhook URL, not test
Problem 3: Messages Come and Go
What’s happening: Some messages work, others don’t
How to fix:
- Check N8N history for errors
- Make sure your webhook always responds with code 200
- Keep responses fast (under 20 seconds)
- Check your WhatsApp message limits
Keep Your Webhook Safe
Protect Your Tokens
- Use strong tokens (like passwords)
- Change them sometimes
- Never share them publicly
Make It Secure
- Add error handling in your code
- Keep logs to check problems
- Think about extra security layers
Follow Privacy Rules
- Follow local laws about data
- Don’t keep messages longer than needed
- Protect sensitive customer data
Make It Fast and Reliable
Speed Tips
- Keep webhook responses simple
- Do heavy work in background
- Handle errors properly
Plan for Growth
- Watch how many messages you get
- Plan for busy times
- Check and improve regularly
Test Everything
Simple Testing
- Send yourself a WhatsApp message
- Check if it shows up in N8N
- Make sure all data is there
- Check response works
What to Test
- Verification process
- Message receiving
- Error handling
- Speed under load
You’re All Set!
Setting up WhatsApp webhooks might seem tricky at first, but it’s really just two main steps: get Meta to trust your webhook, then switch to receiving messages.
The key is to keep verification and message handling separate. Test everything regularly and keep an eye on how it’s working.
Your webhook setup will help you reply to customers faster and automate lots of boring tasks. Pretty awesome for your business!
Quick Recap
Here’s what we did:
- Set up 3 nodes for verification
- Got Meta to approve our webhook
- Turned off verification nodes
- Created message receiving node
- Connected WhatsApp to webhook
- Tested everything works
Now you can receive WhatsApp messages instantly and build cool automations!
Stuck somewhere? Don’t worry – webhook setup can be tricky the first time. Go through each step slowly and test as you go. You’ve got this!


Thank you for this detailed WhatsApp config on n8n. For those who doesn’t use selfhosted n8n maybe not understand about how confused it is in configuring how to handle WhatsApp trigger. This post does really save my day.